A few years ago, I wrote an article on how it was possible to hack into a friend’s Facebook account on public, unsecured, or poorly secured Wi-Fi, when using Facebook over an unencrypted connection. In that post, I mentioned you could tunnel your home connection via SSH to wherever you are and that there will be a post written one day on how to do this.
Well, in this post I’m going to go through a couple of methods for SSH tunnelling and how go about doing it.

The OpenSSH logo
For this, you’ll need a server or home computer running a Linux distribution of your choice. A Raspberry Pi is an ideal system for this application, due to its low running costs. You will also need to set up your home router to forward your SSH port through to the outside world. Refer to your router’s manual for instructions on how to do this. It’s recommended to set your public SSH port to something other than the default (port 22) to deter hacking attempts (for this tutorial, I’ll use the standard port 22 and will pretend my SSH server is hosted at example.com). It’s also worth installing Fail2Ban on your server to block brute forcing attempts by blacklisting IP addresses that repeatedly fail to log in to your server.
On your machine, you’ll need an SSH client. Mac, Linux, and BSD users will most likely have one of these installed and ready to go out of the box, but for Windows users, I’d suggest installing Cygwin with openssh installed, this will allow you to use the same examples I’ve provided for *nix users.
It’s also possible to set up tunnels using PuTTY which is generally regarded as the standard go-to application for SSH on Windows, but it’s not as easy, if possible at all, to write scripts like we’ll be using in this tutorial.
Tunnelling your home internet to a remote location
Ok, lets keep things simple for this one and learn to route your home internet connection to a remote location. Let’s say you’re on holiday out of the country, and need to access a website which is unavailable in the country you live in (TV Catchup services for example). The process for this is incredibly simple.
Run the following from you terminal:
$ ssh -p 22 -fN [email protected] -D7070
Once connected, go to your web browser and in your proxy settings, set the following:
- Server: localhost
- Port: 7070
- Socks: Socks V5
I recommend using a browser plugin for managing proxies such as FoxyProxy.
Every web request you do whilst the settings are in place will now go over your SSH tunnel and you’ll be able to surf the same sites you would from home.
Tunnelling your work workstation to your home network
Note: check with your IT department before attempting this, I cannot be held responsible for any disciplinary action taken against you and/or your colleagues as a direct or indirect result of following the steps in this tutorial.
Any decent IT solution at a company will not allow you to expose your machine’s SSH server to the world. This isn’t a problem though, as you can set up what’s known as a reverse tunnel to allow you to create an outbound connection to a location you’ll either be at, or be able to access later, and route your traffic back in the other direction.
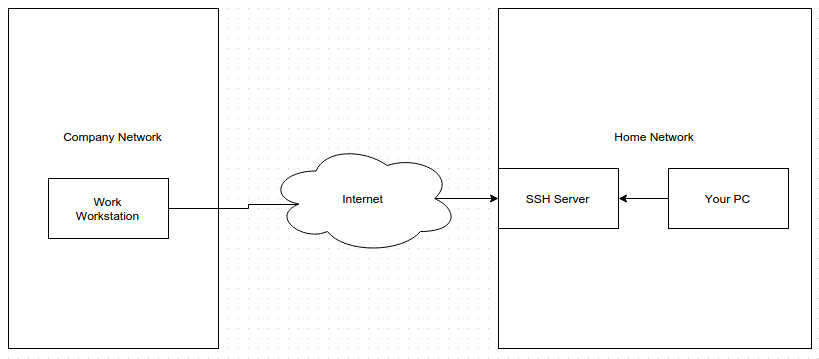
A diagram showing the tunnels we’ll be creating.
This type of connection needs to be initiated at the remote end, so writing a script is vital to maintain uptime as you will most likely not be there to reconnect the tunnel should it go down. Your workstation will need to have a passwordless SSH key generated, and your server will need your workstation’s public key in its authorized_keys file to allow the script to run without halting when a password prompt is given.
#!/bin/bash

REMOTE=$1
RPORT=$2
TPORT=$3

createTunnel() {
/usr/bin/ssh -M -S tunnel-link -fN -R ${TPORT}:localhost:${RPORT} ${REMOTE}
if [[ $? -eq 0 ]]; then
echo Tunnel to remote server created successfully
else
echo An error occurred creating a tunnel to remote server RC was $?
exit 1
fi
/usr/bin/ssh -S tunnel-link -O check ${REMOTE} 2>&1 | sed "s/[^0-9]//g;s/^$/-1/;" > link.pid
}
##

kill -0 $(cat link.pid)

if [[ $? -ne 0 ]]; then
echo Creating new tunnel connection
createTunnel
fi
Save this as reverse_tunnel.sh and give it executable permissions.
This script takes three parameters:
- The user and host of the SSH server you’re connecting your workstation to: ([email protected])
- The port of the SSH server: (22)
- The port we want to set up at the server end: (7000)
What it does is the following:
Creates a function called createTunnel in there we attempt to connect to the SSH server creating a socket call tunnel-link whilst opening a port on the remote server (in our case, 7000) and fork this process into the background (the -fN is responsible for this, with the f responsible for the fork, and the N telling SSH not to execute any commands and just open the tunnel). If this fails, we abort with an exit code of 1. If we’re successful, we then run ssh to check what the running process ID of the forked process and to write that to a file called link.pid. After we’ve defined this function, we then check for any process running with the process ID (written in the file), and if the response is an error, to run the createTunnel function to set up the tunnelled connection.
It’s best to set up a cron job to execute this script every minute.
* * * * * /home/user/reverse_tunnel.sh [email protected] 22 7000
Once this is set up, go to your home computer, and set up a forward tunnel to your SSH server:
$ ssh -fN -L 7000:127.0.0.1:7000 [email protected] -p 22
This will open a port on your local machine (in this case 7000) which is told to connect to port 7000 on the server at its local address, finally, we say where the SSH server is, and its public port.
At this point, the tunnel between your local machine, and your workstation should be established. We can test this out but running the following:
$ ssh [email protected] -p 7000
You should then be asked for the password of your workstation, and have access to your workstation’s command prompt. You could combine this with the dynamic tunnel above to route your internet traffic through your work places’s connection. This can be useful for accessing intranet services from home. You could also use sftp to access the file system of your machine from home. The Nautilus file manager on Gnome based desktop interfaces on *nix platforms has native support for this.

Browsing the file system using Nautilus on Ubuntu
It’s also possible to forward X11 over the SSH tunnel, this can be useful for running applications installed on your workstation at home. Note, this can be slow depending on your internet speed.
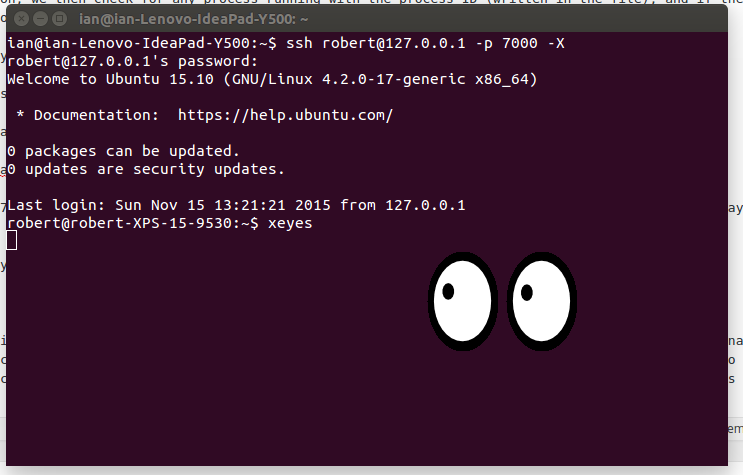
Tunnelling xeyes running on my work’s workstation over the SSH tunnel
You may find that after a certain amount of time, the tunnel stops responding. If this is the case, you can sometimes regain control by killing the SSH process on your SSH server, and hope the script will do its job and reconnect you after a few minutes. You can generally fix this issue by setting the ServerAliveInterval setting on the client or the ClientAliveInterval setting on the server.
Final notes
Setting up SSH tunnels are much quicker and easier than using a VPN solution such as OpenVPN or IPSec, but for more permanent link (say, between offices, or homes), a VPN is a more stable and suitable solution.
At some point, I’ll go through some more examples of how SSH tunnels can be used, such as for securing MySQL replication.
Cheers